Velo by Wix: Add hotkeys to Wix site
In this article, we look at how to add hotkeys to your Wix site with the Custom Element and tiny npm library

We have a task to add some hotkey combinations to the Wix site. The Velo doesn't have any API for keyboard bindings. But we are able to solve this issue with the Custom Element and small npm library tinykeys.
Custom Element
The custom element is a build-in browser set of JavaScript APIs that allow you to define your own custom elements and their behavior, which can then be used in your user interface. Velo has integration with Custom Elements APIs. We can use this technology on Wix Site. About Custom Elements
The Custom Element is available only on the Wix Site with its own domain (not a free Wix domain like user.wixsite.com/sitename) it's a security reason.
Let's start by creating a custom element. We should create a folder custom-elements in the public sidebar section. It's a required folder structure. In the custom-elements folder, we create hot-keys.js file.
Create a class with two lifecycle callbacks:
connectedCallback()for adding the keyboard event listenerdisconnectedCallback()for cleaning the listeners
public/custom-elements/hot-keys.js
class HotKeys extends HTMLElement {
  // Invoked when
  // the custom element is first connected to the document's DOM.
  connectedCallback() {
    // add event listeners here ...
  }

  // Invoked when
  // the custom element is disconnected from the document's DOM.
  disconnectedCallback() {
    // remove event listeners here ...
  }
}

// Register a new custom element
customElements.define('hot-keys', HotKeys);
Add the Custom Element to a site page
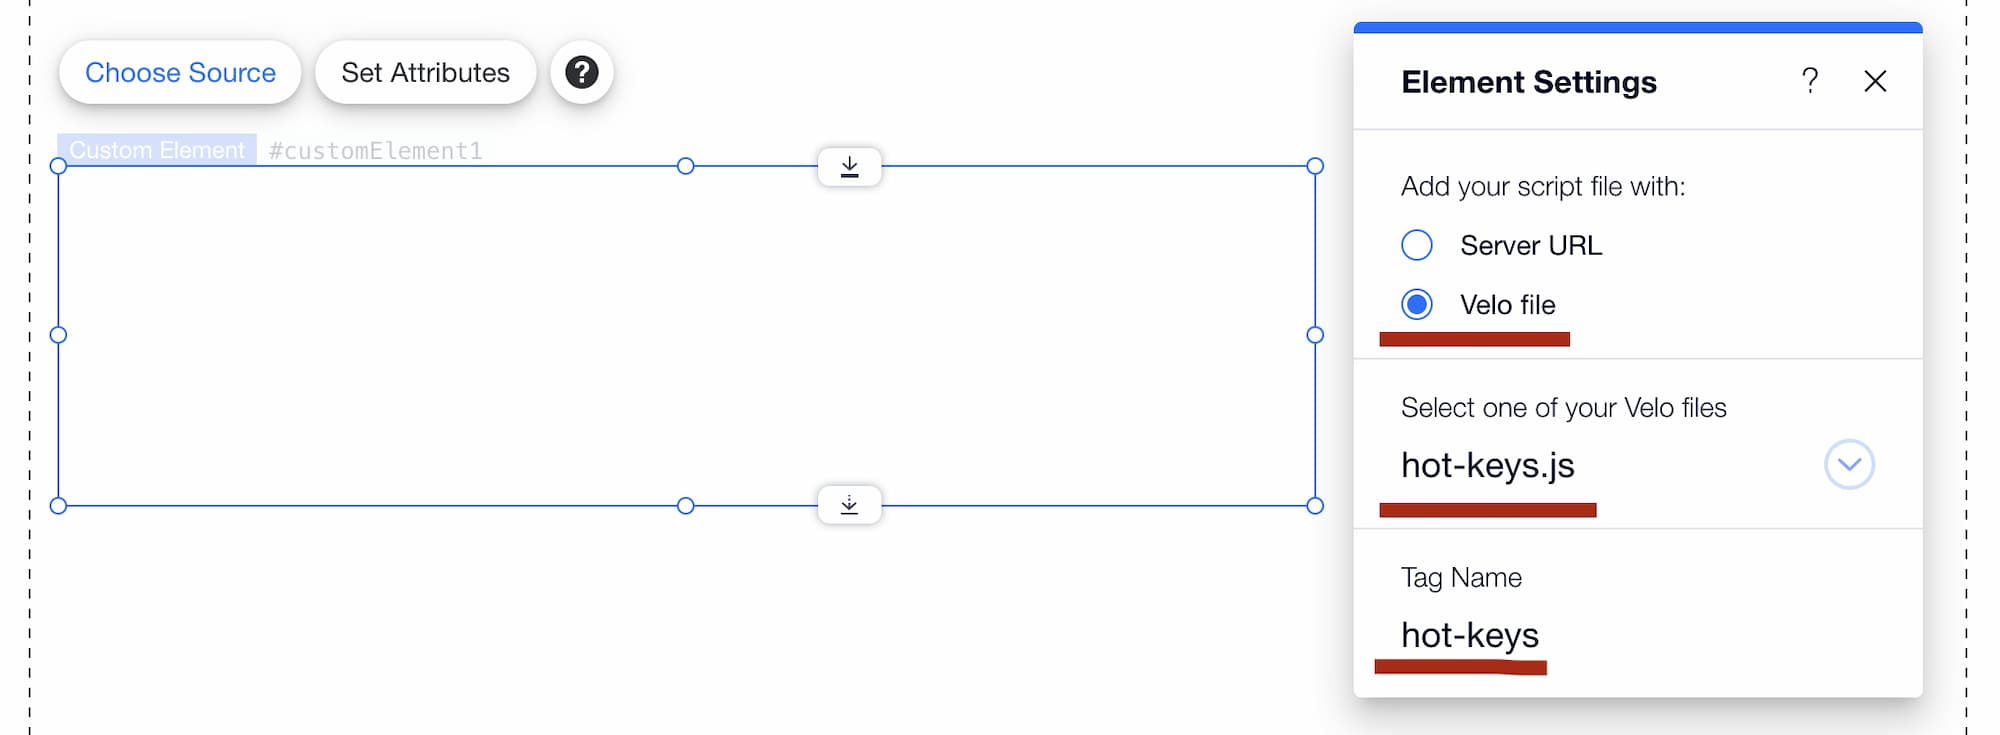
We should add Custom Element to the site page where we want to use it.
- Click Add on the left side of the Editor.
- Click Embed Code.
- Click the Custom Element to add it to your page.
- Click Velo File and select the
hot-keys.jsfile - Enter the tag name
hot-keysthat defined incustomElements.define()
Our custom element won't have any UI. We only need its functionality. You can move it anywhere in the Editor.
Installing npm package
In this step, we install npm library tinykeys with Package Manager. This library covers all nuances of keybinding. It has a small size and good documentation.
 npm
npm tinykeys (v.1.2.0)
Configuring hotkeys
Here we create a config file. Each keybinding will look like adding a new property to the config.
Let's suppose we want to listen Shift+A and Shift+D combinations. To config, we create an additional keys.js file in the public section.
Learn more about keybinding syntax in the documentation.
public/keys.js
/** @enum {string} */
export const Keys = {
  shiftA: 'Shift+A',
  shiftD: 'Shift+D',
};
With Keys enum, we map the keybinding to the options object. Each listener is a function that will dispatch its own event type with CustomEvent.
public/custom-elements/hot-keys.js
import tinykeys from 'tinykeys';
import { Keys } from 'public/keys';

class HotKeys extends HTMLElement {
  connectedCallback() {
    const options = {};

    Object.values(Keys).forEach((type) => {
      options[type] = () => {
        this.dispatchEvent(new CustomEvent(type));
      };
    });

    this._unsubscribe = tinykeys(window, options);
  }

  disconnectedCallback() {
    this._unsubscribe?.();
  }
}

customElements.define('hot-keys', HotKeys);
We can listen to triggered custom events from the custom element on the Velo code. We also use the Keys enum to subscribe to the events in Velo.
Page Code Tab
import { Keys } from 'public/keys';

$w.onReady(function () {
  let i = 0;

  $w('#text1').text = `${i}`;

  $w('#customElement1').on(Keys.shiftA, () => {
    $w('#text1').text = `${++i}`;
  });

  $w('#customElement1').on(Keys.shiftD, () => {
    $w('#text1').text = `${--i}`;
  });
});
Code Snippet
We create a hotkeys listener on the Wix site with the Custom Elements component and Package Manager. Here are the full code snippets:
public/custom-elements/hot-keys.js
import tinykeys from 'tinykeys';
import { Keys } from 'public/keys';

class HotKeys extends HTMLElement {
  connectedCallback() {
    const options = {};

    Object.values(Keys).forEach((type) => {
      options[type] = () => {
        this.dispatchEvent(new CustomEvent(type));
      };
    });

    this._unsubscribe = tinykeys(window, options);
  }

  disconnectedCallback() {
    this._unsubscribe?.();
  }
}

customElements.define('hot-keys', HotKeys);
public/keys.js
/** @enum {string} */
export const Keys = {
  shiftA: 'Shift+A',
  shiftD: 'Shift+D',
};
Page Code Tab
import { Keys } from 'public/keys';

$w.onReady(function () {
  let i = 0;

  $w('#text1').text = `${i}`;

  $w('#customElement1').on(Keys.shiftA, () => {
    $w('#text1').text = `${++i}`;
  });

  $w('#customElement1').on(Keys.shiftD, () => {
    $w('#text1').text = `${--i}`;
  });
});
Do you have any questions? 🐦 I'm on Twitter ✍️
Resources
Web components
- An introduction to writing raw Web Components
- Using custom elements
Window.customElementsCustomEvent()